Welcome to the first project I’ll be taking on as Woodshop Girl!
I want to share the journey from design and DIY to finished product, to teach you some of the basic skills needed to take any room from the dull and dismal “Before” to the shiny and magnificent “After”. There is a very important step you should always consider before you tackle any project involving an entire room or a major renovation, and that is PLANNING! I know we all just want to dive in and get our hands dirty, but before you start swinging a sledgehammer at your home, stop for a sec!! Taking the time for this integral part of your project will save you much more time in the end than it takes you in the beginning, so I would highly recommend you take me up on this nugget of advice.
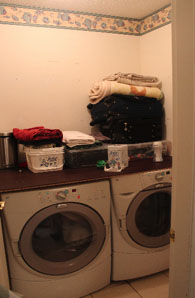
Here is the glorious ‘Before’
TRUST ME! I’ve made it so quick and easy for you.
I have a very simple 4 step planning process; the scale of the project will determine exactly how much detail goes into each of these steps.
1. NEEDS
Why you’re renovating, which will lead you to what you need in your renovation and help you focus on the things that are important in the end and not just pretty. It helps to think of any problems you are trying to solve with the current space.
2. WANTS
Consider the things that will make the space amazing to you; home magazines and pinterest can be great tools for this, and I also like to just wander through home depot.. This can also help when it comes to figuring out your budget
3. BUDGET
Figure out what you are willing to (or can afford) to spend, then work backwards from there. Figure out the price tag on each element, including anything you will have to hire out to professionals. (My rule of thumb is this: if something you are considering doing yourself could potentially kill you or majorly F* up your home, call a pro… Major plumbing or electrical fall into this category…) Start with the things that are most important, because there are always ways to save money on the other things with a little creative ingenuity, bargain hunting and DIY magic.
4. BLUEPRINT
This is basically just the logistics; figure out what you need to do to complete the project and the order you need to do things in to do it efficiently, then set a rough timeline
So that’s the basic idea of the planning process; read on if you want to see how it applies to my laundry room re-vamp.
ASSESSING THE NEEDS
The laundry room itself is a fairly small space, at only 5′ by 6′ (for those of you who don’t know, this little typographical symbol here ‘ means feet, which is equal to twelve inches in the imperial measurement system, and this little guy right here ” is the symbol for inches). I wanted to change it up because what was existing was just non-functional and inefficient… So step 1 for me is solving those problems to make it a functional space, and to do that here are my NEEDS:
- There is ZERO storage, and I want to hide my mess. Because honestly, who the heck doesn’t? And FYI, storage space is KEY to making things look tidy; it gives you a place to hide all your stuff that isn’t so nice to look at. When it comes to small spaces, coming up with clever storage is very important. I’m going to address this issue by adding some drawers underneath the machines, some upper cabinets above and some freestanding/floating shelves of some variety. I’m also going to create a built-in shelf above for folding (ok, maybe just sorting) laundry before it gets put away.
- The door doesn’t open all the way with this temporary counter in it’s current place. To solve this problem I’m going to move the washer and dryer to the wall on the right when you enter the room. I took a few measurements to make sure this is possible, and it can be done if I have the power source for the dryer moved because it won’t reach from where it is.
- The wallpaper is just flat out ugly and NEEDS to go.
FIGURING OUT THE WANTS
I’ve done a few renovations in my day, so I have a pretty good idea of my personal design aesthetic. This step for me is just visualizing what the space will look like (think colors and materials) and what will go into it to make my vision a reality. I want glass doors on the cabinets, but I’m not sure my budget will permit that so it may be something I sacrifice for a less expensive option; after all, it is only the laundry room, where I hope to spend the least amount of time I possibly can… Also, as far as return on investment goes, this is not a wise place to blow the budget for resale value. Otherwise, my “WANTS” include a few decorative elements to wake the space up which can be the last thing to consider when all the important things are done.
DETERMINING THE BUDGET
I had originally hoped to keep this whole project under $500, but moving the electrical ate up $200 right off the bat. I do believe that if you’re going to put in the effort and dollars to renovate something, going a little over budget to meet your NEEDS is alright, so for me layout and storage were acceptable expenses. Most of the material I’ll be using is stuff I already have; paint, salvaged wood and DIY skills will create the built-in drawers. I also have all the tools already, so my biggest expenses are cabinetry and electrical. I’m willing to go up to $650 on my budget to get it done right.
BLUEPRINT; FIGURING OUT HOW IT WILL ALL COME TOGETHER:
This is a relatively small project (in the grand scheme) so I just quickly put things in order of what to do. It looks like this:
- Get an electrician to move the outlet
- Patch and repair the drywall when he’s done, remove the wallpaper.
- Paint
- Hang cabinets
- Build the drawers/any built-ins
(These last two steps can be done in reverse order, but I need to consider the fact that we still need to use the space throughout the project, and this will be more accommodating… With 3 adults and two toddlers living here, there is a load of laundry needing to happen everyday. ESPECIALLY since this little guy is also potty training right now…)

So there you have it; the process and the plan for things to come with this project! Check back soon to see a tutorial on how to patch and repair drywall as I tackle the next step in the process. I will literally be doing the work one-handed as I let this little baby here heal… Yes, thanks to my broken pinky finger I am off work for awhile and actually have time to finish something ☺ (with help, of course… Just in case my boss is reading this)

Did you Like What you Read?
Sign up for our Newsletter and get Tools, Tricks & Tips to Educate & Inspire you straight to your Inbox!!